Friday, December 19, 2014

Uses of Indexes in mysql

Uses of Indexes in mysql:

A database index is a data structure that improves the speed of operations in a table. Indexes can be created using one or more columns, providing the basis for both rapid random lookups and efficient ordering of access to records.

While creating index, it should be considered that what are the columns which will be used to make SQL queries and create one or more indexes on those columns.

INSERT and UPDATE statements take more time on tables having indexes where as SELECT statements become fast on those tables. The reason is that while doing insert or update, database need to insert or update index values as well.

For adding index in table :

CREATE UNIQUE INDEX index_name
ON table_name ( column1, column2,...);

You can use one or more columns to create an index. For example, we can create an index on tutorials_tbl using tutorial_author.

CREATE UNIQUE INDEX AUTHOR_INDEX
ON tutorials_tbl (tutorial_author)

You can create a simple index on a table. Just omit UNIQUE keyword from the query to create simple index. Simple index allows duplicate values in a table.

If you want to index the values in a column in descending order, you can add the reserved word DESC after the column name.

mysql> CREATE UNIQUE INDEX AUTHOR_INDEX
ON tutorials_tbl (tutorial_author DESC)


Thanks
Friday, December 5, 2014

Completely Login your site using Facebook, Here Backend - Laravel(php) & Frontend - Ionic(for mobile app)

Completely Login through Facebook:

Hi all, Today i am here for writing an article which is used for login your mobile app through Facebook.

Here, i am doing this using APIs. So, my backend is Laravel Framework(PHP)  & my frontend is Ionic Framework(mobile app).

Backend:

Just write down these function after your login function in your model .

    public function fbLogin(){
        $input = Input::all();          //getting all data(name,email,fb_id) from frontend
        $email = $input['email'];
        $fbId = $input['fb_id'];
        $firstName = $input['first_name'];
        $lastName = $input['last_name'];

        $user = DB::table('users')
            ->where('username', $email)
            ->orWhere('fb_id', $fbId)
            ->get();
        $noOfRow = count($user);   //getting data from table w.r.t. email


//in case where fb_id & email are exists in DB & same as getting data  row will show 1, in case fb_id $email exists in DB but not both are same then case =2, in case when both does not exists case = 0
      if($noOfRow==1){
            DB::table('users')->where('username', $email)->update(array('fb_id' => $fbId));      
            $userID = $user[0]->id;
        }elseif($noOfRow==2){
            foreach($user as $v){
                if($v->fb_id==$fbId){
                    $userID = $v->id;
                }
            }
        }else{
            if($email){
               return $this->doLoginforFB($email,$fbId, $firstName,$lastName );
            }else{
                $timeStamp = md5(microtime());
                $dummyEmail = $timeStamp.'@dummy.com'; //creating dummy email
                return $this->doLoginforFB($dummyEmail,$fbId, $firstName,$lastName );
            }
        }
         return $this->getUsersDetailsById($userID);
    }

    public function doLoginforFB($email,$fbId, $firstName,$lastName ){
        $password = mt_rand(10000000, 99999999);  //creating a dummy password
        $hashPass = Hash::make($password);

        $newUser = new User();
        $newUser->username = $email;
        $newUser->password = $hashPass;
        $newUser->fb_id = $fbId;
        $newUser->save();

        $this->RegisterStep($newUser->id);

        DB::table('users_details')->insert(
            array('firstname' => $firstName, 'lastname' => $lastName, 'user_id'=>$newUser->id)
        );

       
        $input['username'] = $email;
        $input['password'] = $password;

        Input::replace($input);

        $request = Request::create('oauth/login', 'POST');  //laravel way for passing parms in doLogin function or you can call here your Login function
        $response = Route::dispatch($request);
        return $response;
    }


Frontend:

Accordingly using this i have created my Frontend.

Just follow its steps and get all the details of any user like email, fb_id , name and send it to your backend.

After that make a build and check it out if its working

Thanks
Ashish Ginotra

Friday, November 21, 2014

Easy way to transfer payment from one account to another using STRIPE in php

Transfer payment from one account to another using STRIPE:


This is done by the following way:

1. Deduct the amount from customer using main account of Stripe.

2. Add amount to the merchant using the same main Stripe account.

For this you will be in need of a Stripe testing/working account.

Firstly Register yourself at Stripe.com

and add stripe in your project it will generate a key & configure it in your account

Then Deduct money from any account using this


Stripe_Charge::create(array(
  "amount" => 600,
  "currency" => "usd",
   "card" => array(
    "number" => "4242424242424242",
    "exp_month" => 10,
    "exp_year" => 2015,
    "cvc" => "314"
  ),
  "metadata" => array("order_id" => "6735")
));


 It will deduct $6 using this card and will be add to Stripe Account.

Now pay amount to merchant account using this

            $bank_acc = Stripe_Token::create(array( "bank_account" => array( "country" => "US", "routing_number" => "bank_routing_number", "account_number" => "bank_account_no" ) ));

            $recipient = Stripe_Recipient::create(array( "name" => "name", "type" => "individual", "bank_account"=>$bank_acc->id ));


            $payment =  Stripe_Transfer::create(array( "amount" => '600', "currency" => "usd", "recipient" => $recipient->id, "description" => "Transfer for test@example.com" ));


It will add $6 to merchant account.

Thanks

Friday, November 14, 2014

Locking Data in Laravel

Locking Data:

There are two mechanisms for locking data in a database.

1. Pessimistic locking

2. Optimistic locking

In pessimistic locking a record or page is locked immediately when the lock is requested, while in an optimistic lock the record or page is only locked when the changes made to that record are updated.

The latter situation is only appropriate when there is less chance of someone needing to access the record while it is locked; otherwise it cannot be certain that the update will succeed because the attempt to update the record will fail if another user updates the record first.

With pessimistic locking it is guaranteed that the record will be updated.

The query builder includes a few functions to help you do "pessimistic locking" on your SELECT statements.

To run the SELECT statement with a "shared lock", you may use the sharedLock method on a query:


DB::table('users')->where('votes', '>', 100)->sharedLock()->get();


To "lock for update" on a SELECT statement, you may use the lockForUpdate method on a query:

DB::table('users')->where('votes', '>', 100)->lockForUpdate()->get();


Thanks

Friday, November 7, 2014

How to send email through terminal in ubuntu?

Send Email through Terminal:

For send a email through terminal firstly install the postfix using this

sudo apt-get install postfix
  
Now go to this file

sudo nano /etc/postfix/main.cf

and change

myhostname = example.com

Put in name of your domain into myhostname.

If you want to have mail forwarded to other domains, replace alias_maps with virtual_alias_maps and point it to /etc/postfix/virtual.

virtual_alias_maps = hash:/etc/postfix/virtual

The rest of the lines are set by default. Save, exit, and reload the configuration file to put your changes into effect:

sudo /etc/init.d/postfix reload

Now run this for checking through terminal

sendmail sample-email@example.org

Friday, October 31, 2014

How to install PHPRoad (phpr) framework on php 5.5

Install PHPRoad on php 5.5:

PHPRoad is a framework which is used for developing web applications. But it has some limitations like it supports only php 5.4 and older version.

This Framework is not useful in case of php 5.5 . Because, some mysql extenstions does not support php 5.5 like mysql_connect. php 5.5 only supports mysqli_connect.

So, For installation of phpRoad in php 5.5 we have to follow the following steps

Step 1:

Firstly Download the zip and extract it on your local machine.

Step 2:

Run it on browser and follow the steps (Including creating key from phproad)

Here, you will face a problem during installation and that is about 
mysqli_connect

For removing it follow the Step 3

Step 3:
 Open this file

Your_application/framework/modules/db/classes/mysql_driver.php

(a). Here edit mysql_connect to mysqli_connect

also add $this->config['database'] in its Db::$connection (Because mysqli takes 4 parameters )

(b). Change all the mysql_ to mysqli_ in this file .

After this retry it on browser.

This time it will be installed successfully.

Thanks
Ashish Ginotra

Friday, October 17, 2014

How to get all addresses with in a radius from a fixed point in database?

Get all Lat. & Lng. w.r.t. a Lat. & Lng. in a radius:

If you want to find out all the latitudes and longitudes with in a given radius from a given latitude & longitude in a database then you have to do this task.

DB Structure:

id    lat                  lng
1    37.386337     -122.085823
2    37.393887     -122.078918
3    37.394012     -122.095528
4    37.402653     -122.079353


In PHP we can use this kind of variables:

$lat = 37, $lng= -122, $radius= 28;

Now if we want to use its radius should be in miles then we will use code 3959
Now if we want to use its radius should be in k.m. then we will use code 6371

Then query is :

"SELECT *,lat, lng, ( 3959 * acos( cos( radians( $lat ) ) * cos( radians( lat ) ) * cos( radians( lng ) - radians( $lng ) ) + sin( radians( $lat ) ) * sin( radians( lat ) ) ) ) AS distance FROM table  HAVING distance < $radius ORDER BY distance "

You will get a result all the latitudes and longitude ids which are exists with in 28 miles radius from your given latitude and longitude.

Thanks
 

Friday, October 10, 2014

How to integrate oauth2 in your laravel application

oauth2 in laravel:

For integrate oauth2 in your laravel application, we have to follow these steps.

Firstly install it using composer.

Write this line in your composer.json 
"lucadegasperi/oauth2-server-laravel": "3.0.x"
and the run this command "update composer"

Now , add these lines in your provider array of this file app/config/app.php 

'LucaDegasperi\OAuth2Server\Storage\FluentStorageServiceProvider',
'LucaDegasperi\OAuth2Server\OAuth2ServerServiceProvider',

and this line in your aliases array
'Authorizer' => 'LucaDegasperi\OAuth2Server\Facades\AuthorizerFacade',

That's it, It is now integrated.

Thanks

Friday, September 19, 2014

Easy Way to upload image in Apigility

Upload Image in Apigility:

1.Firstly Create an api with specific name as i created with 'File2' in your RESTful API & create a service with name 'file'. Here my table name is also 'file' in DB.

2.Change the 'Hydrator Service Name'  - Zend\Stdlib\Hydrator\ClassMethods

3.Create a field same as your table field name & change this field 'Will this field be a file upload?'  - Yes

4.Now in your controller there are only two files:

FileCollection.php
FileEntity.php

5.Now create 4 more files there
FileMapper.php
FileResource.php
FileService.php
FileServiceFactory.php

6.Now go to module/File2/src/File2/module.php and add these functions there.

public function getServiceConfig()
    {
        return array(
            'factories' => array(
                'File2\V1\FileService' => 'File2\V1\Rest\File\FileServiceFactory',
                'File2\V1\Rest\File\FileResource' => function($sm) {
                    return new \File2\V1\Rest\File\FileResource($sm);
                },
            ),
            'invokables' => array(
                'File2\V1\File\FileEntity' => 'File2\V1\Rest\File\FileEntity',
            )
        );
    }

    public function getHydratorConfig()
    {
        return array(
            'factories' => array(
                'Zend\Stdlib\Hydrator\ClassMethods' => function($sm) {
                    return new \Zend\Stdlib\Hydrator\ClassMethods(false);
                },
            ),
        );
    }


7.Now go to your created file FileResource.php and add these here

<?php
namespace File2\V1\Rest\File;
use ZF\ApiProblem\ApiProblem;
use ZF\Rest\AbstractResourceListener;
use Zend\ServiceManager\ServiceManager;

class FileResource extends AbstractResourceListener
{
    protected $serviceManager;
    public function __construct(ServiceManager $serviceManager)
    {
        $this->serviceManager = $serviceManager;
    }
    public function create($data)
    {
        $uploaddir = '/home/ashishginotra/image/';
        $uploadfile = $uploaddir . basename($_FILES['image']['name']);
        if (move_uploaded_file($_FILES['image']['tmp_name'], $uploadfile)) {
            $data->image = $_FILES['image']['name'];
        } else {
         /*print something */
        }
        return $this->getFileService()->saveFile($data);
    }

    public function getFileService()
    {
        return $this->getServiceManager()->get('File2\V1\FileService');
    }
    public function getServiceManager()
    {
        return $this->serviceManager;
    }
    public function setServiceManager($serviceManager)
    {
        $this->serviceManager = $serviceManager;
        return $this;
    }

}
 ?>

Here 'image' is my field name  in  my table 'file'


8. Now go to your crated file FileService.php and add these here

<?php
namespace File2\V1\Rest\File;
use Zend\ServiceManager\ServiceManager;
use Zend\ServiceManager\ServiceManagerAwareInterface;

class FileService implements ServiceManagerAwareInterface
{
    protected $serviceManager;
    protected $mapper;
    public function saveFile($data)
    {
        $FileEntity = new FileEntity();
        $this->getMapper()->getHydrator()->hydrate((array)$data, $FileEntity);
        if (!is_null($FileEntity->getid())) {
            $this->getMapper()->update($FileEntity);
        } else {
            $this->getMapper()->insert($FileEntity);
        }
        return $FileEntity;
    }

    public function getServiceManager()
    {
        return $this->serviceManager;
    }
    public function setServiceManager(ServiceManager $serviceManager)
    {
        $this->serviceManager = $serviceManager;
        return $this;
    }
    public function getMapper()
    {
        return $this->mapper;
    }
    public function setMapper($mapper)
    {
        $this->mapper = $mapper;
        return $this;
    }
}


9. Now go to your created file FileMapper.php and add these here

<?php
namespace File2\V1\Rest\File;
use ZfcBase\Mapper\AbstractDbMapper;
use Zend\Paginator\Adapter\DbSelect;
class FileMapper extends AbstractDbMapper
{
    protected $tableName = 'file';
    public function insert($FileEntity)
    {
        $result = parent::insert($FileEntity);
        $FileEntity->setPostId($result->getGeneratedValue());
    }
    public function getTableName()
    {
        return $this->tableName;
    }
    public function setTableName($tableName)
    {
        $this->tableName = $tableName;
        return $this;
    }
}


10. Now go to your created file FileServiceFactory.php and add these here

<?php
namespace File2\V1\Rest\File;
use Zend\ServiceManager\FactoryInterface;
use Zend\ServiceManager\ServiceLocatorInterface;
class FileServiceFactory implements FactoryInterface
{
    public function createService(ServiceLocatorInterface $serviceManager)
    {
        $mapper = new FileMapper;
        $mapper->setDbAdapter($serviceManager->get('Zend\Db\Adapter\Adapter'));
        $mapper->setEntityPrototype($serviceManager->get('File2\V1\File\FileEntity'));
        $mapper->getHydrator()->setUnderscoreSeparatedKeys(false);
        $service = new FileService();
        $service->setMapper($mapper);
        return $service;
    }
}


11. Now go to FileEntity.php and change it as :
<?php
namespace File2\V1\Rest\File;
class FileEntity
{
    protected $id;
    protected $image;
    public function getid()
    {
        return $this->id;
    }
    public function setid($id)
    {
        $this->id = $id;
        return $this;
    }
    public function getimage()
    {
        return $this->image;
    }
    public function setimage($image)
    {
        $this->image = $image;
        return $this;
    }
}


12. Now go to 'Postman' which is your REST client application & set header Mime-type -  mulipart/form-data , select form-data Type 'file' and upload your image. You can do it also using json format and using 64 base encode format instead of file .

Thanks

Friday, September 12, 2014

How to use Filtering in Apigility

Filtering in Apigility:

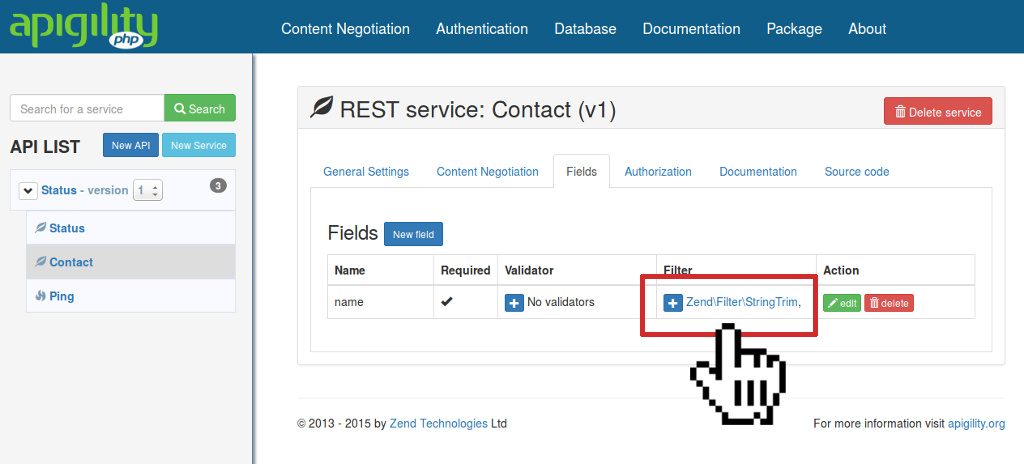
After creating any api service we can use its filteration by using its backend.

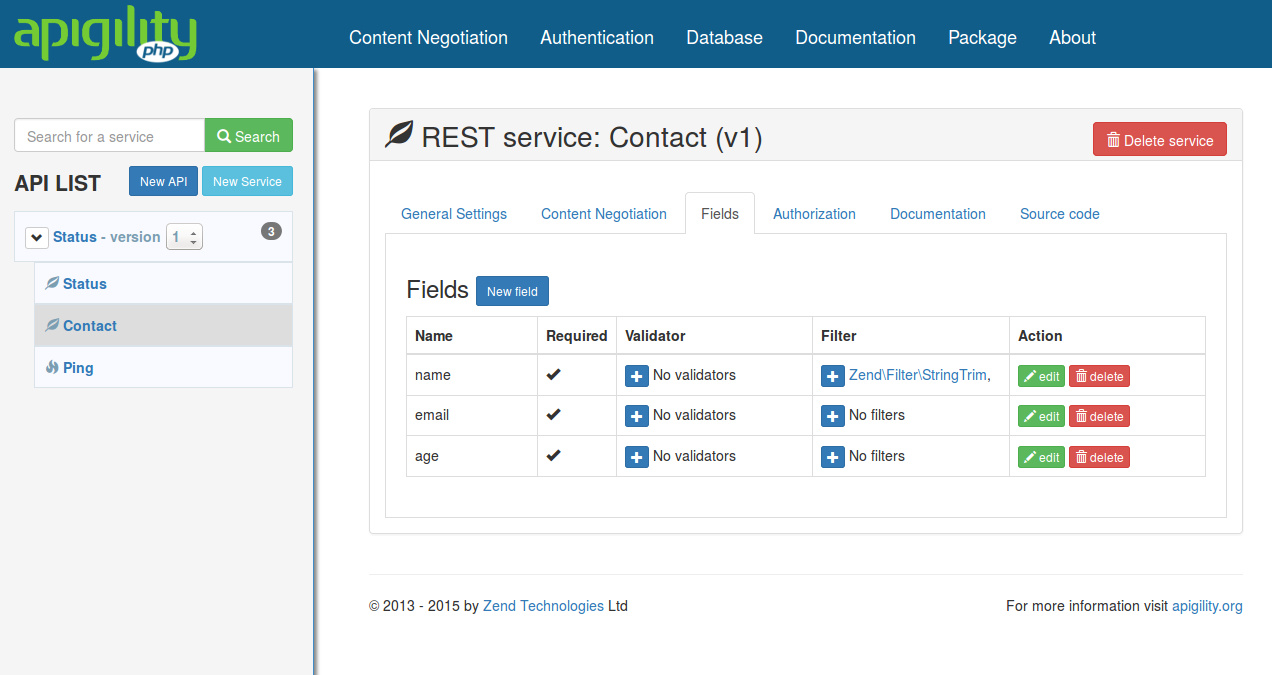
Content Validation Filtering Setup
After this if you send any request like
POST /contact HTTP/1.1 Accept: application/json Content-Type: application/json; charset=utf-8 { "age": "34", "email": "ralph@rs.com", "name": " Ralph Schindler " }

Then you will get response like
HTTP/1.1 201 Created Content-Type: application/hal+json Location: http://localhost:8000/contact/5 { "_links": { "self": { "href": "http://localhost:8000/contact/5" } }, "age": "34", "email": "ralph@rs.com", "id": 5, "name": "Ralph Schindler", "notes": null }


Thanks

Friday, September 5, 2014

How to use validations on field in Apigility

Validation in Apigility:

Its very easy to use validation on the fields in case of Apigility. For this we have to use the following steps.

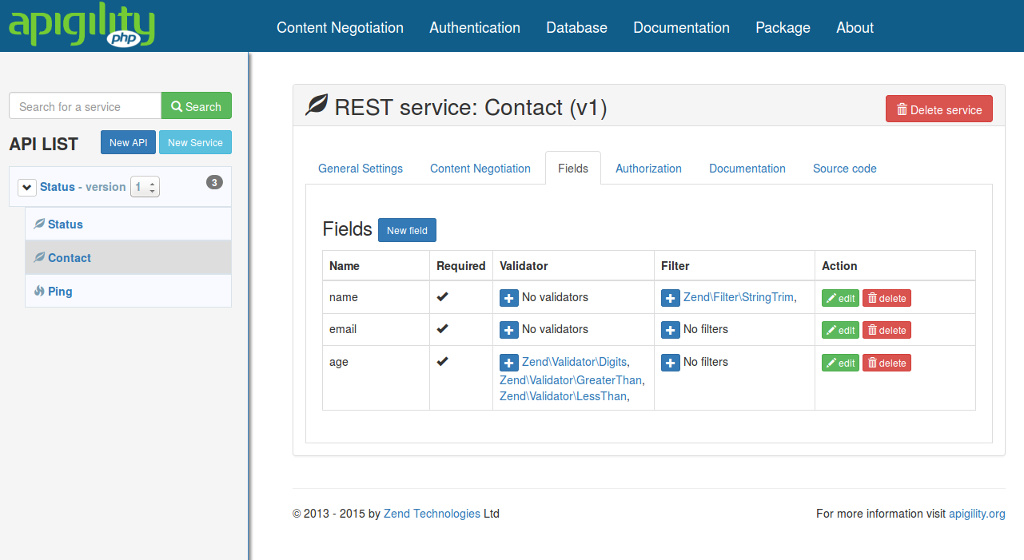
If we have fields like this:

Content Validation Required Field
Then if we send request

POST /contact HTTP/1.1 Accept: application/json Content-Type: application/json; charset=utf-8 { "name": "Ralph", "email": "foo@bar.com" }
 It will give the following response
HTTP/1.1 422 Unprocessable Entity Content-Type: application/problem+json { "detail": "Failed Validation", "status": 422, "title": "Unprocessable Entity", "type": "http://www.w3.org/Protocols/rfc2616/rfc2616-sec10.html", "validation_messages": { "age": { "isEmpty": "Value is required and can't be empty" } } }
Because age is not there.

For age's validation if we want it should be digit & should be between in 1 to 120 then we will use the following.

Content Validation Multiple Validators
 Thus we can use validations in fields

Thanks

Friday, August 29, 2014

Get Oauth2 Access & Refresh Token in Apigility (ZF2)

Oauth2 Access & Refresh Token:

For set up of oauth2 go to your config/autoload/local.php and add it in return array

'zf-oauth2' => array(
        'storage' => 'ZF\\OAuth2\\Adapter\\PdoAdapter',
        'db' => array(
            'dsn' => 'mysql:dbname=zend_db;host=localhost;charset=utf8',
            'username' => 'root',
            'password' => 'root',
        ),
        'allow_implicit' => true,
        'enforce_state' => true,
    ),


Set your configuration according to your requirements.

Create your tables accordingly this file

vendor/zfcampus/zf-oauth2/data/db_oauth2.sql

 Insert these fields accordingly your tables

client_id testclient and client_secret testpass, and a user with username testuser and a password testpass.

Password and Client Secret should be in bcrypt form

Now for testing run this in your address bar

http://localhost/oauth/authorize?response_type=code&client_id=testclient&redirect_uri=/oauth/receivecode&state=xyz
 
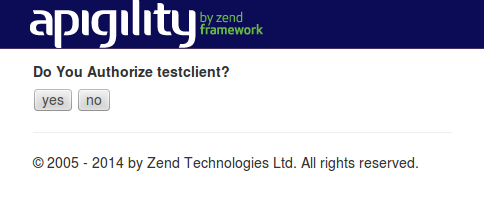
Now it will show a screen like 


Authorize
Now click on yes.

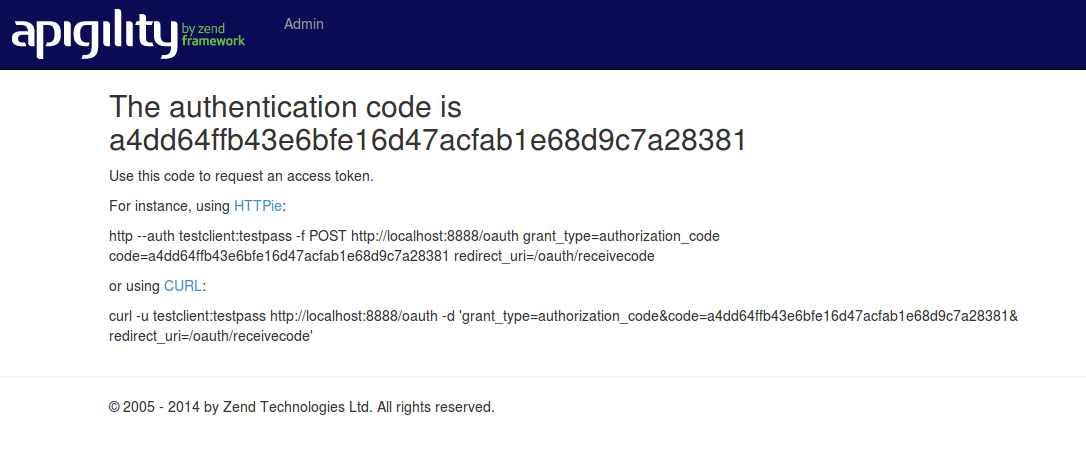
It will show a screen like

Authentication code
Now run curl command in your terminal with in 30 seconds. It will provide you access and refresh token.

Thanks

Friday, August 22, 2014

How to create RESTful DB Connected api through Apigility (ZF2) ?

Api through Apigility:

Install Apigility:

For installing apigility , open terminal & run this command where you want to install apigility.

curl -sS https://apigility.org/install | php

After that run this command for composer.phar

$ php composer.phar require "zfcampus/statuslib-example:~1.0-dev"


Configure files: 
Now go to this file config/autoload/local.php

 And replace

return array(
    'db' => array(
        'driver' => 'Pdo_Mysql',
        'dsn' => 'mysql:dbname=database_name;host=localhost',
        'username' => 'user_name',
        'password' => 'user_pass',
        'driver_options' => array(
            1002 => 'SET NAMES \'UTF8\'',
        ),
        'adapters' => array(
            'mainadapter' => array(
                'driver' => 'Pdo_Mysql',
                'database' => '
database_name',
                'username' => '
user_name',
                'password' => '
user_pass',
                'hostname' => '127.0.0.1',
                'charset' => 'utf8',
            ),
        ),
    ),


Now go to config/application.config.php 
and edit


array(
    'modules' => array(
        /* ... */
        'StatusLib',
    ),
    /* ... */
)
 
Create a PHP file data/statuslib.php that returns an array:
<?php
return array(); 
 
Now create a hash using  http://www.htaccesstools.com/htpasswd-generator/ and put it in data/htpasswd file. Here put a username and password which you want to authenticate.


Run for port 8888:
Run this command in your terminal where public is folder in side apigility folder

php -S localhost:8888 -t public public/index.php

and keep it as it is. Don't stop this command.

Create REST Api:

Go to http://localhost. Then click on 'Admin' and then 'APIs' 

Create new api with name 'Status'.

Now refresh page and click on 'Status'.

Goto Rest Service and click for new one.

Go to DB connected and select 'mainadapter'. put table name 'status' and create DB connected. 

Also create table 'status' in your db.

Make sure your config, data and module folder has write permission.


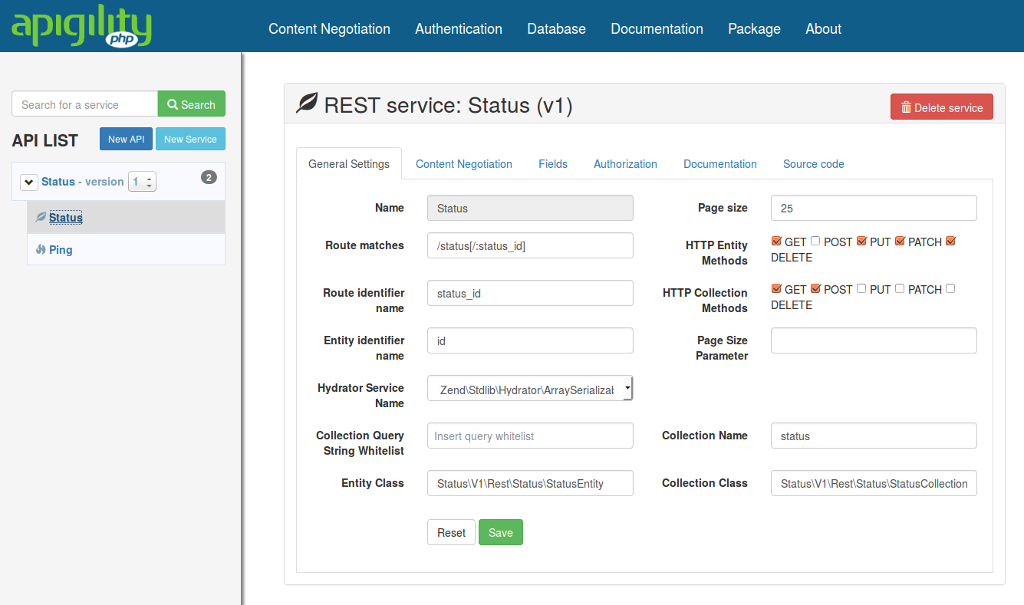
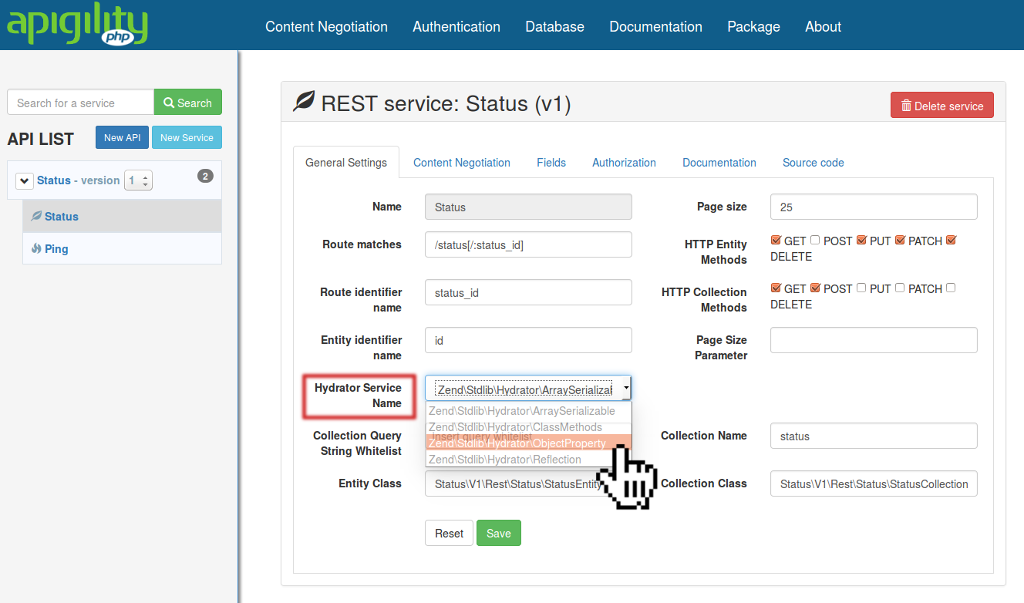
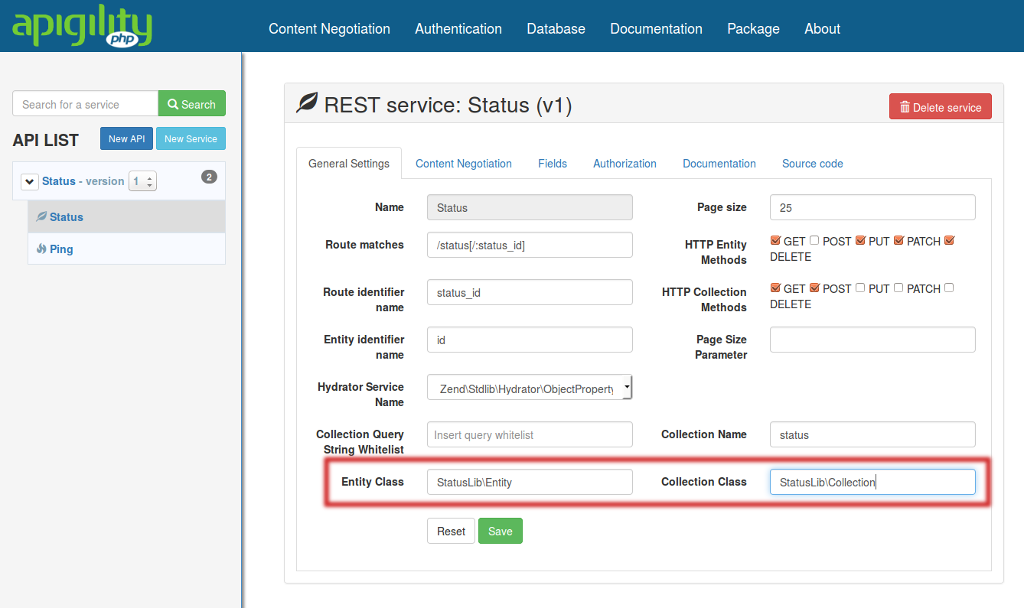
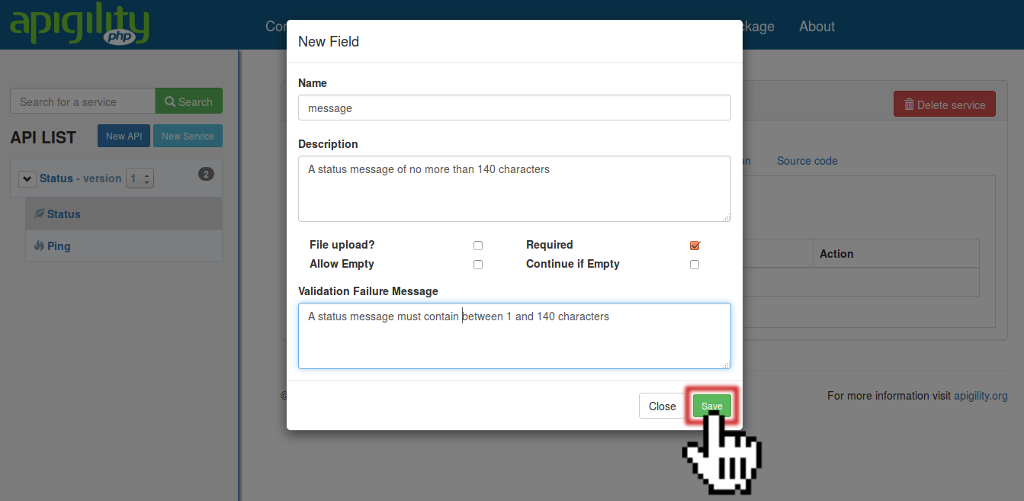
Now setting all the page according to these images.


REST Services Screen
Edit REST Parameter Settings
Edit Service Classes
Message Field
All Fields
 These field names should be accordingly your table fields.

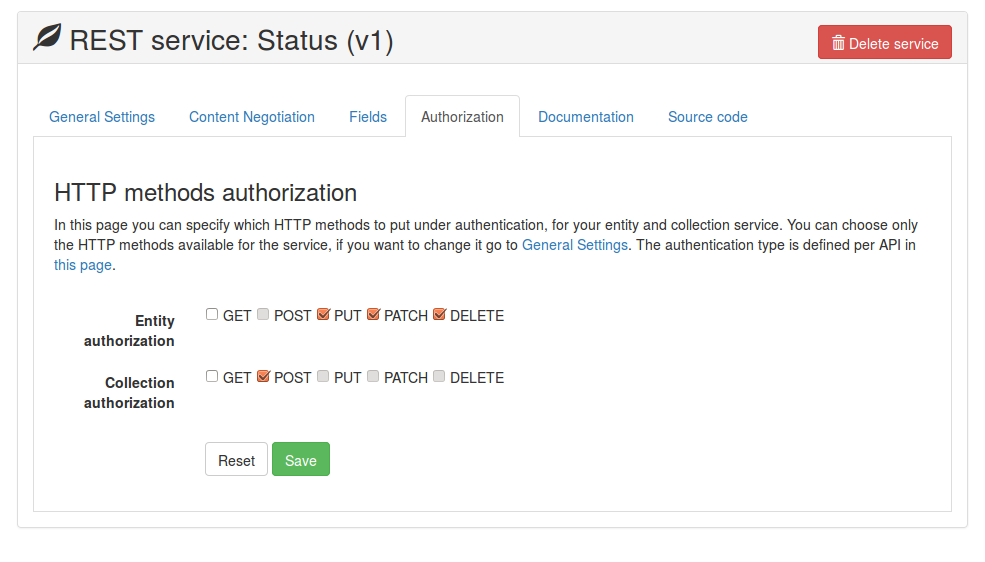
Now go to authorization and do this

Authorization - Complete
Now create a new file
module/Status/src/Status/V1/Rest/Status/StatusResource.php

 
 and add

<?php
namespace Status\V1\Rest\Status;
use StatusLib\MapperInterface;
use ZF\ApiProblem\ApiProblem;
use ZF\Rest\AbstractResourceListener;

class StatusResource extends AbstractResourceListener
{
    protected $mapper;
    public function __construct(MapperInterface $mapper)
    {
        $this->mapper = $mapper;
    }

    /**
     * Create a resource
     *
     * @param  mixed $data
     * @return ApiProblem|mixed
     */
    public function create($data)
    {
        //return new ApiProblem(405, 'The POST method has not been defined');
        return $this->mapper->create($data);
    }

    /**
     * Delete a resource
     *
     * @param  mixed $id
     * @return ApiProblem|mixed
     */
    public function delete($id)
    {
        //return new ApiProblem(405, 'The DELETE method has not been defined for individual resources');
        return $this->mapper->delete($id);
    }

    /**
     * Delete a collection, or members of a collection
     *
     * @param  mixed $data
     * @return ApiProblem|mixed
     */
    public function deleteList($data)
    {
        //return new ApiProblem(405, 'The DELETE method has not been defined for collections');
        return $this->mapper->deleteList($data);
    }

    /**
     * Fetch a resource
     *
     * @param  mixed $id
     * @return ApiProblem|mixed
     */
    public function fetch($id)
    {
        //return new ApiProblem(405, 'The GET method has not been defined for individual resources');
        return $this->mapper->fetch($id);
    }

    /**
     * Fetch all or a subset of resources
     *
     * @param  array $params
     * @return ApiProblem|mixed
     */
    public function fetchAll($params = array())
    {
        //return new ApiProblem(405, 'The GET method has not been defined for collections');
        return $this->mapper->fetchAll();
    }

    /**
     * Patch (partial in-place update) a resource
     *
     * @param  mixed $id
     * @param  mixed $data
     * @return ApiProblem|mixed
     */
    public function patch($id, $data)
    {
       // return new ApiProblem(405, 'The PATCH method has not been defined for individual resources');
        return $this->mapper->update($id, $data);
    }

    /**
     * Replace a collection or members of a collection
     *
     * @param  mixed $data
     * @return ApiProblem|mixed
     */
    public function replaceList($data)
    {
        return new ApiProblem(405, 'The PUT method has not been defined for collections');
    }

    /**
     * Update a resource
     *
     * @param  mixed $id
     * @param  mixed $data
     * @return ApiProblem|mixed
     */
    public function update($id, $data)
    {
        //return new ApiProblem(405, 'The PUT method has not been defined for individual resources');
        return $this->mapper->update($id, $data);
    }
}


 Now create a new file
 module/Status/src/Status/V1/Rest/Status/StatusResourceFactory.php

and add

<?php
namespace Status\V1\Rest\Status;
class StatusResourceFactory
{
    public function __invoke($services)
    {
        return new StatusResource($services->get('StatusLib\Mapper'));
    }
}


Its Done Now.

For testing:

GET /status HTTP/1.1
Accept: application/json
 
You will get your table data in JSON format

Thanks